ADP Setup tab in Location Configuration

Before exporting data to ADP payroll software you'll need to set a few fields in various Power Clock records.
Location Configuration
ADP Export Company ID
This is the company ID assigned to you by ADP.
ADP Hours 3, 4, 5 Codes
These are the special hours type codes as defined in your ADP software. They are used for special hours types such as vacation.
Group by job into "Temp Dept" column
Enable this option if you want Power Clock to group your time export by job. You must have an 'ADP Export Dept' code assigned in each job record if you enable this.
Job Records
Assign a value here if you want Power Clock to group your ADP time export by job. ADP calls this "Temp Dept'. Don't worry about this if you don't have jobs enabled in Power Clock.

Employee Records
Assign the ADP ID for each employee on the Export Settings tab of the employee records.

After you have all those settings done, you're ready to export time data do ADP for payroll processing.
Select ADP Export from the Import Export menu.
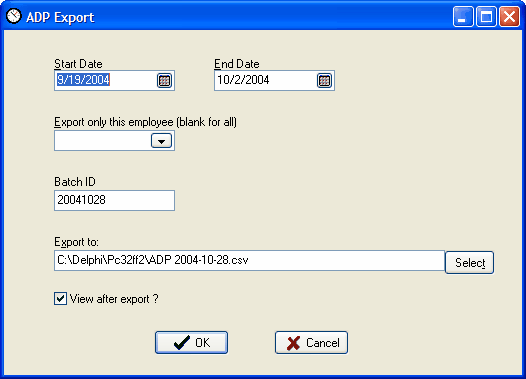
Start Date, End Date
Enter the date range of time records you want to export.
Export only this employee
If you only want to export a single employee's time data then enter her employee ID here.
Batch ID
This should be a unique identifier for this particular export. Power Clock will enter the current date in yyyymmdd format as default. You can change this to anything you want.
Export to
Enter the folder path and filename to export to. ADP expects a filename extension of CSV. You should use a unique name for each time export.
View after export
Enable this if you want to load the exported text file into Windows Notepad after the export. Usefull for testing to see if your export looks ok.